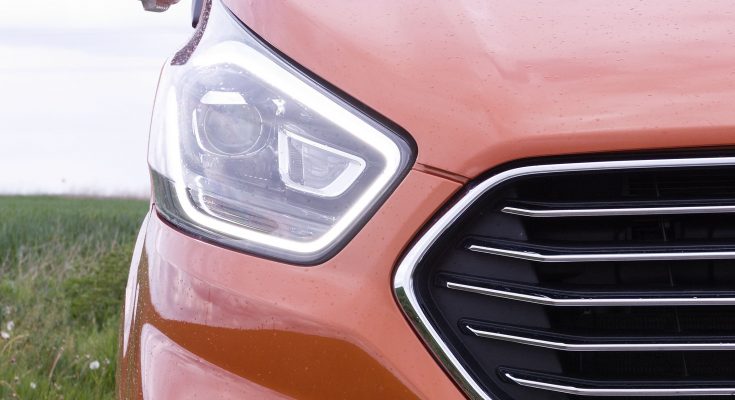
The older the car, the more problems it can have. And not only from the technical point of view, but also from the aesthetic point of view. However, it doesn't necessarily have to be just paint problems, such as corrosion. Problems can also be connected with the plastic parts of our car. Headlights are an ideal example. In this regard, the older the car, the more damaged it can be. And this is not only due to age, but also due to the fact that there is quite significant damage from flying stones and other impurities. So how to fix the lights without having to replace the entire headlight ? Polishing the headlights will help in this case.
With or without a set
There are many different kits on the market today that contain everything needed to get the headlight polishing done as well as possible. The given sets basically include everything that is needed. In this case, we are talking, for example, about the fact that various sanding and polishing pastes are included, as well as sanding or polishing papers, cloths, or discs.
The second possibility is subsequently the path that is connected with the fact that we only make do with things that we buy all around us, or that we find at home. Many people use, for example, ordinary toothpaste as a great tool, which can also replace special polishing pastes. It is also possible to do without it. And we will focus on this procedure together.
First, everything needs to be prepared
It is essential that we do not damage any other part of our car when grinding and polishing the plastic lights. Therefore, proper preparation is the basis. We lift the hood, take the adhesive tape and simply stick all the parts that are in the immediate vicinity of the light, i.e. its glass itself. Of course, plastic can also be used if we want to protect individual areas a little more. In this case, we can already say that we are done and it is possible to start the initial grinding.
Use 1000 grit sandpaper
This should be perfectly sufficient for initial grinding. If we have it, all you have to do is follow our instructions. And what does it consist of? Of course, in that we must thoroughly sand the entire surface of the given light with this sandpaper, i.e. the entire surface of the glass. What we must not forget is the fact that it is best to proceed evenly, taking into account that all places on the glass are sanded with the same intensity. Due to the nature of the sandpaper, we don't have to be afraid to press harder sometimes, because this is the only way we can remove possible minor scratches, which can also affect the fact that the light does not pass through the glass as perfectly as we would like. As soon as we are done with this first and basic step, we can rush to step number two.
Sandpaper marked 2000
The procedure for using it is essentially the same as in the previous case. Here, too, we cannot do without the need to sufficiently and thoroughly grind the entire surface of the glass. This is because in this way we will not only remove other scratches, but we are also sure that we will smooth the glass very well, which is also one of the procedures that we quite logically want to achieve. Once even this step is done, the hardest work is basically over.
Wash the glasses thoroughly
This way we should have both lights polished. That is, both the left light and the right light. If this is indeed the case, we are sure that we can now proceed to the simpler phase, which consists in simply washing the glass. We can either use only water and a special soft sponge, or we can also use regular or better car shampoo. But after this step, we will not forget the quite important and sufficiently good rinsing. The light needs to be washed because there may be very fine dust residues on it, which must be sufficiently removed before the following procedure. As soon as this is done, let the glasses dry, or we can dry them to be sure and lightly polish them with a soft cloth. Already at this moment we should clearly feel that the lights are much clearer, without any scratches, and when we turn on the lights we will see that they shine a little better.
Get some sanding paste
The last stage is the use of a special sanding paste, which is used just for lights as such. Its unique composition can offer two interesting positives. The first is that, as a sanding paste, it can sand the entire surface very well, which logically results in the removal of all other small scratches and possible irregularities. However, thanks to its composition, it can also heal deeper scratches well, which remain in the lights despite the overall perfect care. Even in this case, of course, it is necessary to proceed quite cautiously and think mainly about the fact that we should really polish the given paste in the light more thoroughly. And ideally twice, because this is the only way we can be sure of the most perfect possible result.
Once this step is over, all you have to do is wash the headlight and then it should be clearly visible that its quality has improved significantly, which is especially positive when driving at night, when you will simply see much better. Of course, this is also one of the reasons to take such good care of the lights. Furthermore, we must not forget the fact that in some cases it can happen that possible damage and dirt can be from the inside of the headlight. Here, too, it is possible to use several best practices, but we have to say that they are a bit more complicated than the grinding and subsequent polishing of the plastic lights that we described above.