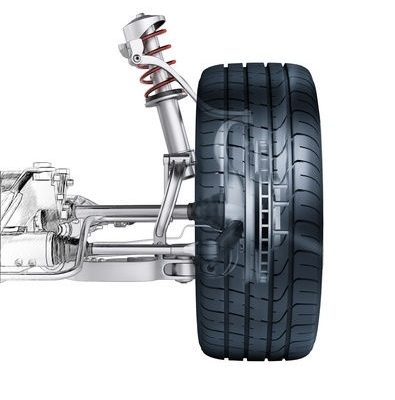
Both springs and shock absorbers are a very important part of our cars. And this, among other things, also because it has an impact not only on the comfort of the ride itself, but also on the safety of our roads. If there is a problem, you need to pay attention to it and proceed with possible replacement. The problem can be springs tired from age, as well as situations where they are cracked. But we can also have problems with the shock absorbers themselves. They also need to be replaced if necessary. In this direction, we will therefore focus on how the front shock absorbers and springs are replaced. Before we begin the description of the specific procedure, it should be noted that the replacement should always be carried out as part of the entire repair. Therefore, shock absorbers and springs should be replaced on both the left and right sides. And this despite the fact that only one side is defective.
It won’t work without a jack
What is essential is, of course, a jack. That is why it is necessary to secure such a space where it will be available. After that, we simply lift the car and secure it in such a way that there is no danger of it falling. As soon as everything is ready, we can devote ourselves to the initial preparatory work. What is it about? Of course, it is a necessity that we first have to loosen and then also remove the front wheel. Since the front shock absorbers and springs will be replaced at the same time, both the left and right wheels must be removed. At this moment, we are almost fully prepared for the exchange itself.
We will start with the disassembly of the shock absorber
Once the wheel is gone, we should have a pretty good view of the shock itself. In this case, we usually cannot do without the need to clean its lower part, since this is where two very important parts are located. It is both a screw and a weight. The screw itself subsequently connects the given parts. This naturally needs to be enabled. Be sure to take into account that more force will be needed and that you will certainly need to use a possible release agent. Only then will loosening the screw be much easier. Once enabled, you can uninstall it entirely. At this point, everything is ready for you to knock the weight itself off that damper.
Allow another connection
Once that’s done, you can focus on the next part of the damper. This time it is the upper part. This is where you should find the nut that holds the damper. Its task is quite clear in this regard, as it is there to connect the shock absorber itself to the body of your vehicle. Here, too, you cannot do without loosening and dismantling the nut. As in the previous case, not only strength will be needed here, but also a potential reliever. Once the nut is removed, you can completely remove the strut.
We will make an exchange
At this point, everything is ready for you to do the most important thing. This means replacing shock absorbers and replacing springs . The first step is, of course, to remove both the spring and the damper itself. Once both parts are out of the vehicle, you place the new parts in their places. Carefully, of course, and in such a way that you can be sure that they really sit in their right places. At this point, you have completed a significant part of the exchange. As part of the replacement, it should be noted that in some cases you can resort to the fact that, in addition to the shock absorber and the spring itself, you will also change the bearing of the upper bearing. It’s not absolutely necessary, but if you’re worried about the specific lifespan of it too, now is the best time to do it.
The fact that you need spare parts must also not be overlooked. If it’s an older vehicle of lesser value, you can’t go wrong if you take parts second-hand, or for example from a junkyard. If it is a newer vehicle, it is definitely better to invest in a new auto part, as the car is expected to serve you for a long time and the individual parts that you are currently replacing yourself need to serve well.
We will carry out subsequent assembly
Once the spring and damper are in place, you can begin the assembly process. Everything here is basically the same as at the very beginning. Just the opposite. So the first step is to put on the strut itself, which you will then assemble. After that, the pullers should be released, and then you can mount the entire assembly on your car in the reverse order. When tightening, be really careful and check that the screw and the nut really hold as they should. That’s the only way you don’t have to worry about any permission.
If you are definitely done, it is possible to repeat the same procedure for the second round. Nothing changes here either. It is only necessary to remember that in some cars the process can be slightly complicated by the half-axle. But it is nothing complicated, because despite this possible complication, you can easily carry out the exchange itself. If it is finished even on the second round, you get to the conclusion itself. Logically, this means nothing more than the necessity of mounting and, of course, tightening both wheels. Now you can lower your car to the ground.
Take a test drive
First slowly, then you can go faster and more aggressively. If something is very important, it is the information that you should monitor the behavior of your car. If everything is in perfect order within the suspension, there is no need to worry about going anywhere other than real traffic. An important step in the final inspection is to stop on a flat surface. Then you need to look at the car from both sides and check if its chassis is level. If it is not, you can simply adjust everything so that everything is in perfect order on this side as well. Now you can say for one hundred percent that the replacement of the front shock absorbers and springs turned out really well and you managed it to the fullest.