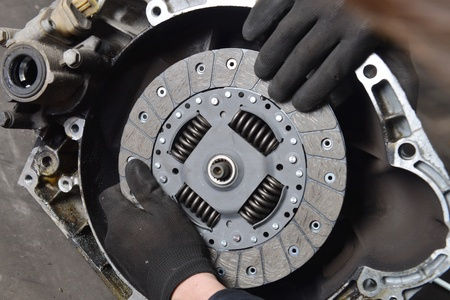
We can recognize a defect connected to the clutch relatively easily. If we drive off, the clutch may slip. In such a case, replacing the clutch is the ideal choice, as it is the simplest possible step we can take.
First, of course, everything must be properly prepared for the exchange itself. Therefore, it is necessary to raise the vehicle to a height and then loosen and, of course, also remove both front wheels. Once that’s done, we’re going to focus solely on the left wheel and that we should loosen the axle nut. Once this step is done, we can continue to drain the oil from the gearbox. Of course, we catch it in a suitable container. Once that’s done, there’s only the last phase of the most important preparations left, that’s when we hang the engine.
Dismantling the half axis
Now we are ready for several important and also necessary actions that are connected with the fact that the replacement of the clutch will be carried out. First, you need to remove the left half-axle from the wheel hub. This can be quite simple, as usually only one step is sufficient, namely the one where we just knock the bottom pin out of the block. If we succeed in this step, it is a good idea to use a pry bar, with which we can simply click out the two half-shafts from the gearbox. Let’s not forget that a little more force will need to be used, but on the other hand, certainly not so much as to avoid some damage.
We continue with disassembly
Now it is necessary to proceed with the disassembly of several other parts of your car. We will definitely start by first disconnecting the battery, which we will then also completely disassemble. Not only that, because the rubber should go quite naturally also its holder. Next, we continue by removing the starter from our car. It’s nothing complicated either, and it’s definitely mastered even by a more skilled car fan.
At this moment, we already have the opportunity to perform one of the main, i.e. more important, steps. This is to disconnect a few things from the gearbox. Specifically, it concerns the shift rods, as well as the clutch cable itself. We also do not forget to disconnect the sensor or the speedometer drive. If you’re done, you can continue with the disassembly itself with a few more steps.
We go to the gearbox
At this moment, it is time to dismantle the hinges of the gearbox itself. It is important to primarily loosen the main screws that connect the transmission to the engine itself. They can be slightly stiff, so it is definitely necessary to have practical relaxers on hand, with which we will do better.
Once we are allowed, we are half won. In this case, we lower the aggregates into such a position that the gearbox can be pulled out of the engine quite easily, without much difficulty. Once you’ve succeeded in this step, it’s definitely good news, because right now you’re sure you’ve managed to free up trouble-free access to where you need to go. The clutch can already be replaced, as you have trouble-free access to it. At this moment, the most important thing can come, which is that we will be able to disassemble it without problems and, of course, also replace it. It may not be such a problem to get a new one today, whether our interest is to stay in the segment of new spare parts, or we prefer to focus on used spare parts.
Before we return everything
Since we had to go through such demanding activities, it is certainly good to take advantage of it and not forget a few specific things that should be done. What kind of things are they? It is a good idea to take proper care of your car’s flywheel, as it is advisable to completely degrease it. It is also recommended to test it, but we can say that it is not quite suitable.
What is very important, on the other hand, is definitely the mounting of the lamella on the pressure plate. One primary thing is very important here, namely that the lamella is exactly in place and that it is perfectly centered. If this happens, we are 100% sure that everything fits in the right place and that the entire transmission replacement definitely comes out the way we need it to.
Further adjustments to the clutch
What activities will you continue to do? If we are more specific, it is definitely advisable to replace the clutch bearing itself with a new one. We will also focus on the transmission shaft, which should be lubricated. Here we will advise that we should not overdo it significantly. Next, we definitely need to focus on the clutch basket, which we will clean. At that moment, we can already mount the gearbox back, as it is ready to continue to serve us.
The final stage
If the gearbox is also in place, there is nothing left to do but to bump the half-axles into it as well. We will check that everything is in place and that everything is in perfect order. If this is the case, we can unscrew the check screw from the transmission and continue by just pouring the necessary oil into it, precisely in the amount that we drained from it before. We finish all the remaining, i.e. the last, activities and we have the car ready for testing.
Now comes the part where we recommend adjusting the cable guide in such a way that the clutch pedal is at the right height. Not only should it suit us, but it should be the same height as the side brake pedal. Now there is nothing stopping you from trying everything and doing the first test drive. If no specific problems are apparent, you are sure that the clutch replacement itself went as it should. So without any hassles and problems. As you can see, you need not only enough time, but also a little more experience with your car and its repairs in the engine compartment.


